

Servings : 7-8" round cake
This recipe is a twist on my Strawberries and Cream Sponge Cake Recipe. In place of the strawberries, I have used pineapple and have made some slight modifications to the syrup used for moistening the sponge. Light as air and fluffy as cotton, each bite of this heavenly cake is in perfect balance. Since this is actually a sponge cake, one can have it without too much guilt over the calories.
Ingredients
- 3 eggs
- 1/2 cup caster/grinded sugar (100 gm)
- 3/4 cup cake flour (90 gm)
- 1 tbsp. butter (15 gm)
- 1 tbsp. milk
- 1/2 tsp. vanilla essence
Additional Ingredients
- 2 cups whipping cream (400 ml)
- 2-4 tbsp. icing sugar
- 1 tsp. vanilla essence
- 1 can of pineapple rings
- 6 tbsp. drained pineapple juice from the can
- 3 tbsp. sugar
Instructions
If you don’t have cake flour, you can make it by removing 1 and a half tbsp. of flour from the measured amount mentioned above and replacing it with 1 1/2 tbsp. of corn flour/cornstarch and a pinch of salt. Sift the two together a couple of times to make sure all is well combined.
Reserve 2-3 pineapple rings for the top garnish. Cut up the remaining into small pieces and drain well. You will need approximately 1 cup of chopped pieces for the cake center.
Warm the pineapple juice in a small bowl in the microwave, then add the sugar and stir until it dissolves. Set this aside to cool for later.
Prepare your cake pan by lining it with grease proof paper and greasing it to make sure the cake doesn’t stick. I used an 8 inch pan. You can use a slightly smaller one if you want a higher cake.
Preheat your oven at 170 C.
Put the butter and milk into a small bowl and set aside.
Sift the flour twice to aerate it and set aside.
Put the eggs in a big glass bowl, then add the sugar. Beat the eggs for 30 seconds. Then dip the bowl in a pan of hot water and keep beating on high speed for 2 minutes. Make sure that the egg mixture doesn’t get too warm, if you stick your finger in it, it shouldn’t be too warm. Remove from the hot water and now put the small bowl of butter and milk into the hot water and leave it there for the butter to melt slowly.
The eggs will have started expanding from the beating. Keep beating for about 4 minutes until the egg mixture resembles cream. The beaters should leave streaks in the mixture as you whip, like how whipping cream looks at the ‘soft peak’ stage.
Once you have reached this consistency, remove the beaters and use a whisk. Whisk the egg mixture for a few seconds.
Now sift all the flour into the egg mixture. Using a spatula, GENTLY fold the flour in using 30 strokes or less. If you over mix or fold too vigorously, you will lose all the air that has built up in the eggs, so be gentle.
When the flour is mixed, take the bowl of butter and milk that you had kept in the hot water. It should have melted by now. Add it into the batter. Also add your vanilla essence. Now fold again no more than 50 times or less until the batter is well combined and shiny.
Pour into the prepared pan. Pick and drop the pan twice to remove any excess air bubbles. Then bake immediately. It should take about 23-25 minutes.
Check using a toothpick or skewer, it should come out clean to indicate the cake is ready. Again pick and drop the pan twice to prevent it from shrinking as it cools.
Now turn the pan over on a cake rack but do not remove the pan. Let the pan cool down until it is easy to handle with your hands without getting burnt.
In the meantime, whip your cream with 2-4 tbsp. icing sugar and 1 tsp. vanilla essence. Adjust sweetness to your taste and set aside.
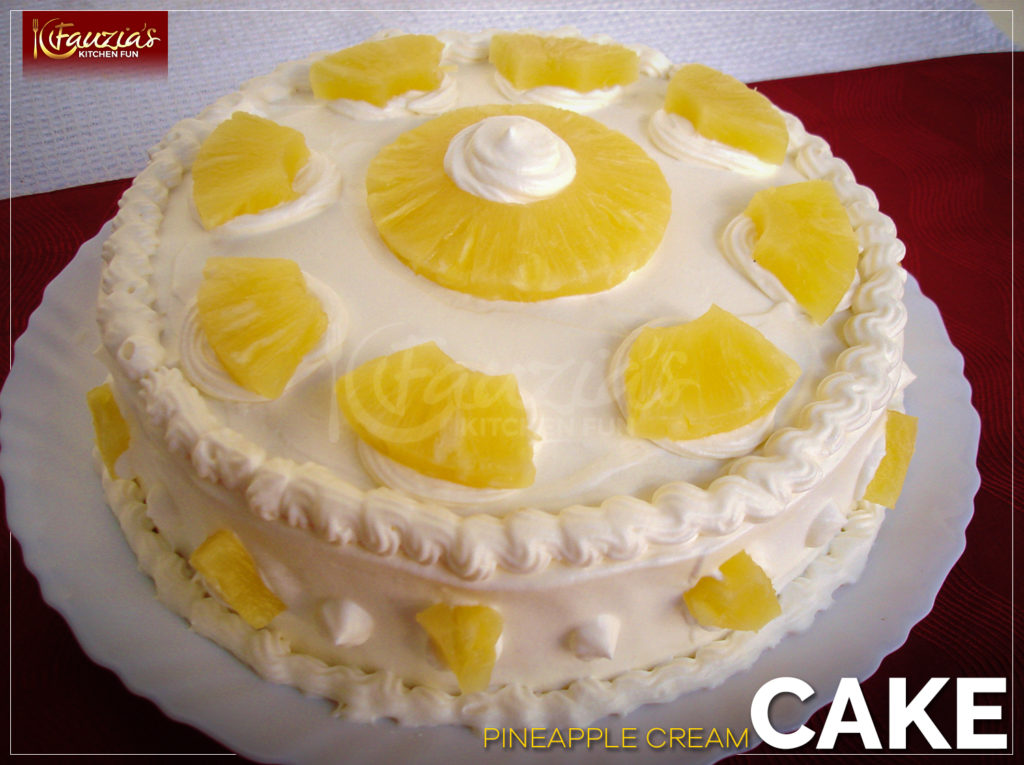
Remove the pan from the cake, remove the greaseproof paper. Cut the cake in half, drizzle or brush the pineapple syrup all over the cut halves, then add cream followed by the pineapple pieces. Cover them with more cream, put the second half of the cake and cream the top. Decorate with pineapple pieces/rings.
Chill until the cream sets and enjoy your yummy cake!
Enjoy! 🙂


Asalamoualaikoum fauzia sis..
Asalamoualaikoum fauzia sis…..well I really appreciate this site as I don’t know how to cook.this has help me a lot in preparing tasty dishes.i would request you if you can put the recipe of akienne please as I want to learn how to do it
W/Salaam, thank you! Sorry I
W/Salaam, thank you! Sorry I do not know what akienne is, is it a dish from a specific country?
hi fauzia, Have u got an
hi fauzia, Have u got an eggless version for this cake as we are pure vegetarians.
Hi, at the moment the only
Hi, at the moment the only eggless cake I have is the chocolate moist one. I will try to post a vanilla version soon. 🙂
Salams sis fauzia
Salams sis fauzia
great recipes, thank you! have a quick question: can I freeze this frosting? if yes, how can I re use it after tht? – with thanks
W/Salaam, normally cream
W/Salaam, normally cream frostings do not freeze well, they tend to release water as they thaw. So I would not recommend freezing.
ASA sister actually i have a
ASA sister actually i have a gas cooker/oven where is the numbering 1 to 8 can you please tell me which number i can use for baking this cake. majority baking things is bake on number 7 can you please confirm me.
and please when you put the temperature please show the number for gas cooker users.
regards
W/Salaam, sounds like your
W/Salaam, sounds like your oven runs using Gas Mark for the temperature. Here is a conversion chart that might help:
http://www.onlineconversion.com/cooking_gasmark.htm
When you say cake flour, do
When you say cake flour, do you mean All purpose flour (maida) or self rising flour ?
Neither actually. Please read
Neither actually. Please read this note: http://www.fauziaskitchenfun.com/how-to-make-cake-flour-self-rising-flour
Hello Fauzia :). I have baked
Hello Fauzia :). I have baked 4 different cakes of yours, absolutely fantastic….. yesterday baked this one… had a few issues.. Is cake flour available in any of the UK supermarkets? I made it at home with plain flour and cornflour.. my cake was very very flat almost as if i had already cut it in half to sandwich the cream…. but i hadn’t yet… I mixed cornflour properly with plain flour and then sifted it 4 times…. the cream frosting was fantastic, however after a while it started becoming bit thin? i tried my best to follow your recipe to the dot…. so any tips? or anyone else had the same problems?
Hi and thanks! I am not sure
Hi and thanks! I am not sure if Cake flour is available in the UK, I do believe it should be though. And as for the flat cake, that will normally have to do with how much you have whipped the eggs and how much you have folded/mixed the batter. The eggs need to be at room temperature to begin with and once the flour has been incorporated into the eggs, too much mixing/stirring will deflate the batter. You need to fold the flour in gently using a light hand. As for the cream, it will only get thin if it was overwhipped. Try whipping it for slightly less time (over an ice-bath).
i have self rising cake flour
i have self rising cake flour? how many cups of that i should take to make this cake?
Sorry no, self rising flour
Sorry no, self rising flour is different from cake flour. It will not work for this recipe.
Thanks for the recipe. My
Thanks for the recipe. My husband liked it so much n it was very soft. I have few queries. Your topping is whitish but mine turned yellowish. Is it due to vanilla essence. Can I use vanilla sugar next time?? Do u have any tips regarding cutting of cake. my cutting of cake was so uneven.
Thanks for the lovely
Thanks for the lovely feedback. Yes it could be the vanilla OR it could be the cream itself, different brands act/colour differently. Yes you can use vanilla sugar. I have found that when the cake is refrigerated for a while it gets a lot easier to cut. Make sure to wrap it well before refrigerating (with cling wrap) to avoid it drying out. 🙂
ASA sis Fauzia! can you show
ASA sis Fauzia! can you show us the whipping cream pic,(I mean it’s pack image) that you use. If you know any store in Islamabad where I can find that whipping cream, please let me know, will be thankful to you.
jazakillahu khair
Different countries have
Different countries have different brands of whipping cream, sorry am not from Pakistan so have no idea what brands are available there.
Hi Fauzia thank you for the
Hi Fauzia thank you for the awesome recipes…..I seem to be spending more time in my kitchen as I am so inspired by your recipes.
I have followed the step by step method of whipping cream, which is perfect until I take it out of fridge to decor my cake it goes runny and I cannot even put it piping bag to makes rosettes. Please can you help with this
Keep up the great work…..it is really appreciated…regards
Hi and thanks! It means you
Hi and thanks! It means you may be overwhipping the cream, it separates when overwhipped. Try to whip it for slightly less time.
assalamualaikum dear fauzia
assalamualaikum dear fauzia and many many thanks to u for describing each and every thing so clearly.there is a query in my mind about this cake is how will this cake rise as there is no baking powder.im going to try this today and wanna make corrections before i try
W/Salaam, if you follow the
W/Salaam, if you follow the instructions carefully for whipping the eggs, the cake will rise beautifully. 🙂
Hi again 🙂
Hi again 🙂
I made the whipped cream frosting. but to keep it simply a vanilla topping by adding just a tsp full of vanilla esscence still gave a dairy cream taste out of it. how do i get the taste of vanilla frosting as we get in bakery made cakes?
Hi! Try using more vanilla
Hi! Try using more vanilla essence, different brands have different levels of intensity. Maybe the one you use is not very strong. So add as much as you prefer in terms of flavour. 🙂
Thankyou so much ma’am 🙂
Thankyou so much ma’am 🙂
hi 🙂
hi 🙂
i wanna know that if i can use grind sugar instead of icing sugar for topping please tell me ASAP 🙂
Hi, any of the two will do. :
Hi, any of the two will do. 🙂
i wanted to make this on eid.
i wanted to make this on eid… i hope it turns out good as yours 🙂
aslm,hope ur in the best of
aslm,hope ur in the best of healthy.i usually make cakes topped with whipping cream,i use brookside whipping cream,y does my cream come out cream in color and not white?which brand in kenya cmes out white?my cream stabilizes but is not stiff enough to make rosettes,what should i do?thanks
W/Salaam, it depends on the
W/Salaam, it depends on the brands. In Kenya try using Millac Gold. It is the best one but comes in 1 litre packets.
Can I add caster sugar in
Can I add caster sugar in place of icing sugar?
Yes in this recipe you can.
Yes in this recipe you can.
asa sister,
asa sister,
I made this cake on my son’s birthday. It turned out really yummy and delicious. Just one quick question, can I use this cake recipe to make a swiss roll? thanks for your wonderful recipes.
Thank you! Yes you can make a
Thank you! Yes you can make a swiss roll out of this recipe. 🙂 It would take about 7 minutes to bake at 200 C.
Dear Fouzia!
Dear Fouzia!
I am amazed with this website as this is so well structured and organized . All the ingredients and methods are very clear. I love to learn baking but I am still a beginner and wanted to follow your footstep in all kind of cooking as you truthfully impressed me. Can I ask did you do professional training?I am a child specialist by profession so it’s certainly hard for me to go somewhere and take professional courses.
Please guide me about the best brands name for icing cream, cooking chocolates and edible food colour as I recently moved to Pakistan.
Million Thanks in Anticipation.
Thank you so much for such a
Thank you so much for such a sweet message! I did not train professionally, just enjoy cooking as a hobby. I am not from Pakistan so am not sure what brands of cream and food colour are available there, however a good chocolate bran that is international is Callebaut. Another is Hersheys. 🙂
ASA Fouzia,
ASA Fouzia,
can i use a plain flour because cake flour is unavailable in my area. This recipe is very helpful for me….. Thank you so much.
I have included a tip on how
I have included a tip on how to make cake flour in the recipe, for this cake to turn out perfectly you need the lightness of cake flour.