Servings : 4 parathas
A delicious soft yet crispy layered flat-bread, one of my family’s personal favourites. Parathas can be had with curries or pickles or just on their own.
Ingredients
- 1 1/2 cup all-purpose flour (you can mix half all purpose and half atta if you like)
- 2 tbsp. ghee (plus a bit extra for rolling and cooking)
- 1 tsp. salt
- warm water or milk (about 1/2 to 3/4)
Instructions

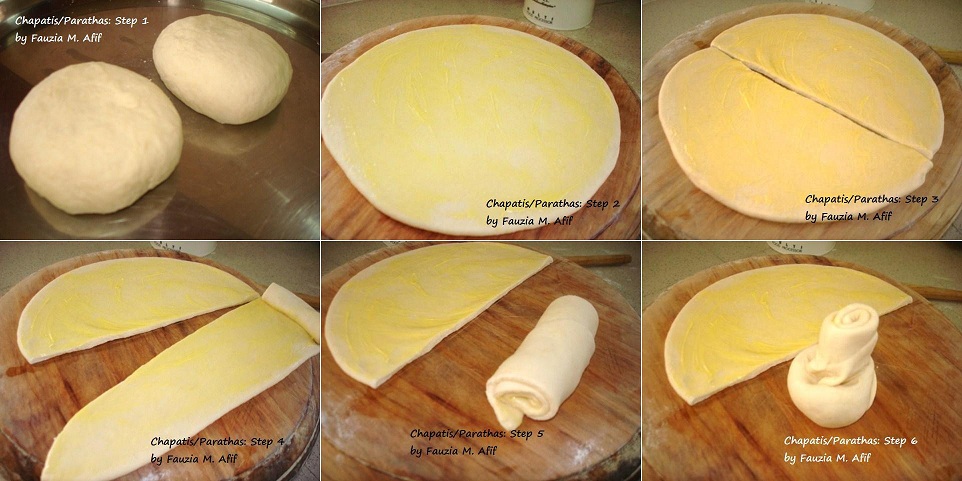
STEP 1: Add the salt to the flour. Rub in the 2tbsp ghee, then slowly add in the warm water or milk and knead until you have a lovely soft dough. The more you knead it the softer your parathas/chapatis will be.
Once it’s kneaded, divide the dough into two balls. Now refer to Step 1 of making the parathas and keep clicking Next to view the subsequent instructions!
STEP 2: Roll each ball out, it doesn’t have to be perfect. Get it as round as you can. Then apply a light layer of ghee all over it. About half a tbsp. should be enough.
STEP 3: Using a knife, divide the rolled out circle in half like this.
STEP 4: Take the first half, and stretch it out a bit. Be gentle, we don’t want it tearing…we just need it to be slightly longer. The longer you can get it, the more layers your paratha/chapati will have. Just don’t make it tooooo stretched out , get it to about 1 and a half its original length!
Now start rolling the stretched out piece from one end to the other.
STEP 5: Here’s how it will look when it’s all rolled up. You can tuck that little end bit in for a neater roll.
STEP 6: Stand the roll on your board or working surface, and sort of tuck it into itself by pushing it gently and slowly down like in the pic. Use your fingers to do this. Push it all the way down neatly.

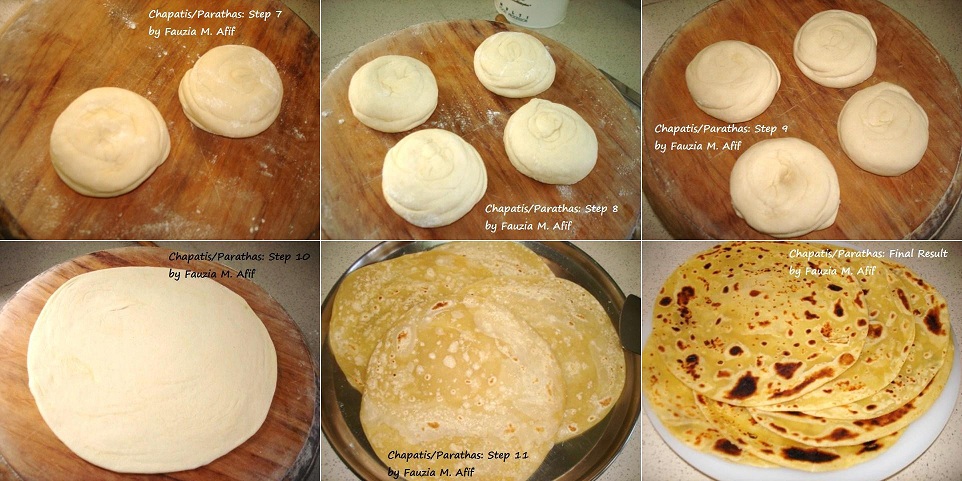
STEP 7: This is how it will look when the roll is squished down. Repeat with the 2nd half of the circle.
Then do the same with the 2nd half of the dough we started with.
STEP 8: So we now have 4 balls of rolled, ghee’d, stretched and squished dough from our recipe. Now set these aside, keep them covered and let them rest for about 15mins to half an hour. This helps get them super soft.
STEP 9: Half an hour later, the rolls are ready for the next stage. They are now very soft to handle. I poked a finger into one of them just to indicate how soft they now are.
STEP 10: Now one by one, roll out each ball into a circle. See the lines and layers? This is due to the ghee/rolling process we did earlier. It helps create layers so that your parathas/chapatis are really soft and crisp.
Make sure you place these rolled out chapatis on some lightly floured surface whilst you roll the rest so they don’t stick.
STEP 11: Once all your parathas are rolled out, heat the tava/flat pan. When it’s hot, gently place one paratha/chapati on it and sort of dry cook it on both sides without adding any oil, for about a minute on either side. Do this with all the parathas, setting them aside once you’re done. They should look something like this photo. Sort of half-cooked.
When all are done, replace each one on the hot tava and add a bit of ghee underneath them and a touch of ghee on their tops…rub it on using the back of a spoon even, then cook them on both sides on medium heat until they are a lovely color on either side. Turn them over a couple of times to make sure they are getting evenly colored and not getting burnt. You can even cook 2 at a time by piling them one on top of the other, I notice this keeps them even softer, but you would need to be adept at making them so don’t try this on your first go. If you can pile and cook them using that method, then go ahead but be sure that you do both sides of each paratha/chapati, coz you don’t want them being uncooked on one side!
Once all are done, pile them one on top of the other, bring the sides together like you’re bunching them up and thump them down a couple of times. This is a trick I learnt some years back that leaves them really really soft. Careful though, coz they will be hot!
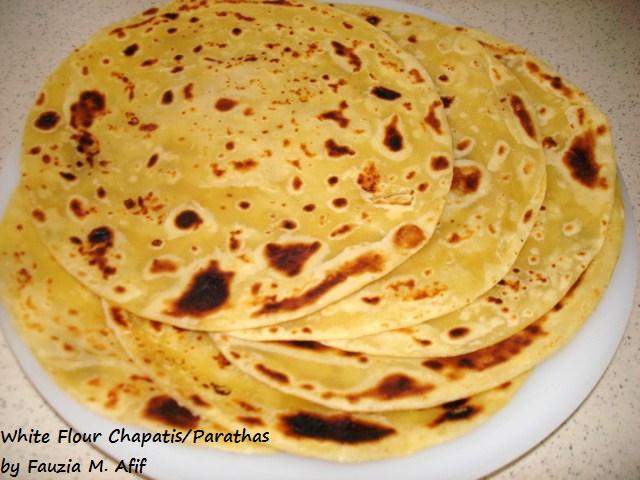
FINAL RESULT! Here is how they will look once they are fully cooked. Beautiful and well-colored, soft yet slightly crispy around the edges.


A.A..shukran for the amazing
A.A..shukran for the amazing recipes..
I usually get superb outcomes..
Question..
I made the chapos and they were amazingly soft and impressive but sam hours later they started getting a bit hard even though I had kept them well in a hot pot…
would you know how I can avoid that?
jazakaAllah..
W/Salaam, thanks for the
W/Salaam, thanks for the lovely feedback! Try to make sure the dough is kneaded well and then rest the chapo dough before rolling out and cooking. Cook on a very hot pan, make sure it is a THICK pan that way the chapatis cook fast and don’t take ages which dries them out.
Salaam .. my paratha turned
Salaam .. my paratha turned to be raw inside after I cooked .. is it because I substituted with atta flour
W/Salaam, no the atta should
W/Salaam, no the atta should not cause it to be raw. It sounds like your paratha were not fully cooked. Next time cook them longer, if need be turn the heat down or roll them out a bit thinner.
Okay thanks .. will follow
Okay thanks .. will follow that
Aoa, I tend to knead the
Aoa, I tend to knead the dough in bulk and refrigerate so I can make chapatis/parathas again for the next couple of days. Do you think kneading again the next day would improve texture of the rotis?
Also, could you actually use only milk to knead the dough? How would that turn out?
Yes a little bit of kneading
Yes a little bit of kneading helps to develop the gluten in the dough so that it is easier to work with, but make sure you allow the dough to rest after kneading so that it relaxes a bit and doesn’t end up too rubbery. And yes you can use just milk, they will be softer. 🙂
Hi
Hi
The chappathis looks tempting.
I want to make it for a dinner party for 15 people.
So is it fine if I do till step 11 (until half cooked stage) then proceed after couple of hours?
or do I need to store it in any other way.
Please advise me .
Hi, yes that is fine, make
Hi, yes that is fine, make sure to keep them covered so they do not dry out. 🙂
I paid for your app but that
I paid for your app but that was the end of that! Never works, browsing became impossible after payment. Should have kept using it for free….please fix instead of asking me numerous questions as before… nothing works is my answer.
Hi, the apps are both working
Hi, the apps are both working perfectly. Please send us an email on fauziaskitchenfun@hotmail.com with exactly what issue you are facing with the app and we will be happy to assist you in sorting it out.
A.A. Can I use vegetable oil or butter instead of ghee. Shukran.
Yes you can.
Jakhaallah Kheir