Servings : Makes 50
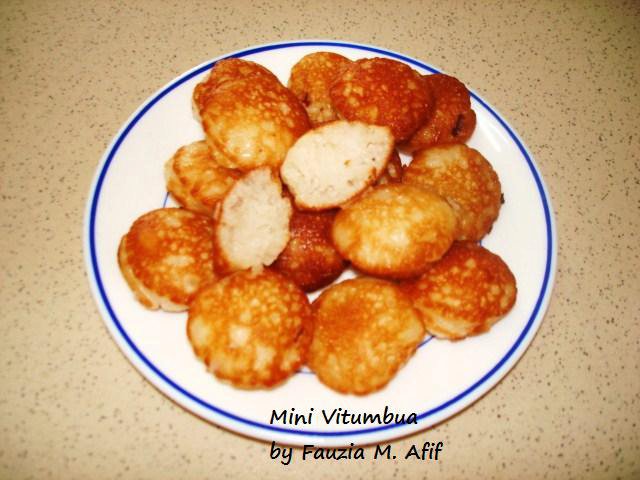
Vitumbua are a coastal east-african dish made of rice or rice flour and coconut. They are delightfully delicious! I made the miniature version using an appam pan.
Ingredients
- 1 3/4 cups thick/heavy tui/coconut milk
- 1 1/2 cups rice (the thick variety if possible, don't use the thin long grain if you can avoid it, we need these to be able to mash up nicely)
- 1 cup sugar (level)
- 1 tsp. instant yeast
- 1/2 tsp. cardamom powder
- oil for frying
Instructions
Soak the rice overnight, and then drain completely. Make sure no water remains in the rice, and you can do this by leaving it in a sieve to drain for as long as you can.

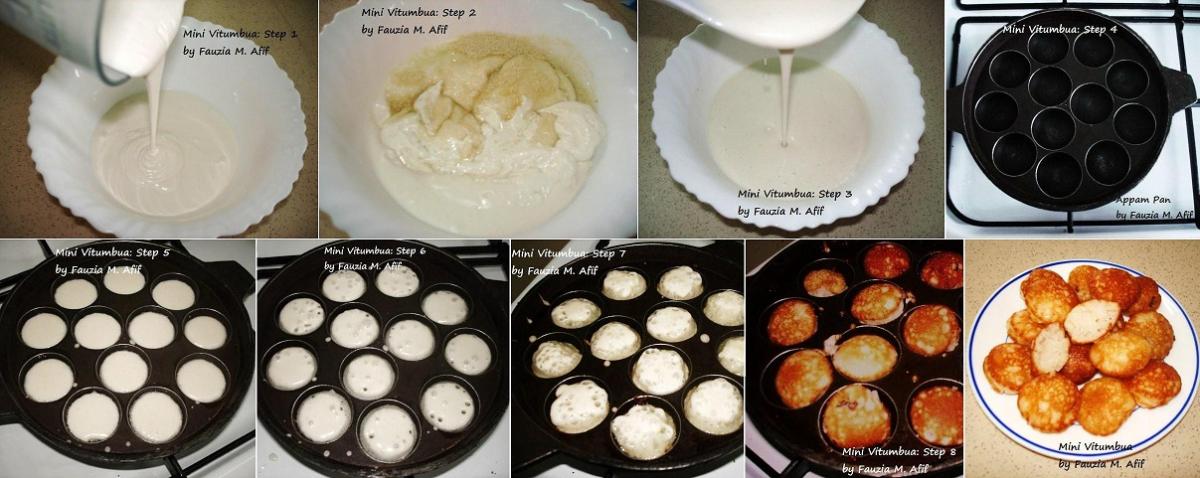
STEP 1: Put the rice, coconut milk, yeast and cardamom powder into your blender and blend until completely smooth. This may take a while but stick to it. Keep blending for a full minute at a time, giving the blender a rest of a few seconds between pulses. Once you’re satisfied that the rice has been mashed completely and your batter is smooth, pour it out into a bowl, cover and set aside to rise for 30-60mins.
STEP 2: This is how thick the batter will look after 30-60 mins. Add the sugar and mix it in using your hand. Make sure you mix it completely such that no sugar granules remain.
STEP 3: Once the sugar is mixed in, the batter will become lighter and slightly more runny in consistency as shown in the pic.
STEP 4: If you have an appam pan like the one in the pic, use it for smaller sized vitumbua. Otherwise use the smallest karai that you’ve got. Add oil into it, half a tsp. per slot if you’re using an appam, otherwise more if using a bigger pan. Heat it up on medium.
STEP 5: Carefully, pour your batter into the pan. Do not over-fill.
STEP 6: As the vitumbua cook, you will notice tiny bubbles forming all over the batter in the pan. This is a good sign, it means your vitumbua will have the perfect sieve-like texture. Keep the heat on low so that the vitumbua cook through without burning
STEP 7: When you notice the vitumbua firming up and their bottoms look colored, gently turn each one over and cook the other side. You can use a skewer or flat wooden stick for this.
STEP 8: Cook the other side to a good golden color. Remove and continue this method for the rest of your batter.
Of course if you are using a bigger pan they will be bigger, and that’s OK too!
Serve warm! 🙂


i dont have appam pan, so i’ll use a karai and was wondering how much oil to use in the karai?
Yes you can, try and use the tiniest karai you have and use just enough oil to cover the base of the vitumbua. Not too much. Think shallow-frying!
Thank you Fauzia 🙂 i love vitumbua and now i can make some myself
Salaams..
Wanted to ask you what measurements can I use if I want to make for 10 ppl and is it ok to use basmati rice?
W/Salaam try a quarter of all measurements although that is going to be tricky to get accurately. Best to make half the measurement and store leftovers.
As in just 10 vitumbuas I need measurement for that thnx
assalam aleikum Fauzia, when u say thick heavy tui u mean d 1st tui, d one u get without adding water? like how many coconuts did u use?
shukran, m planning to try them tomorrow inshaAllah
W/Salaam, yes exactly. It takes 1 big coconut or 2 medium ones. 🙂
Assalaamualaiki,
My sister married a brother from east Africa, and she wants to make this, but we can’t seem to find the proper vitumbia pan. I wanted to buy it for her as a surprise but the closest thing I can find is a abelskiver pan for a danish pastry. Is it possible that you could sale me a proper vitumbia pan? the abeleskiver pans appear to make them look too round like balls instead of vitumbia. If you’re not able to sell one to me, could you point me in the correct direction to purchase one? I would greatly appreciate it insha’allah. I really don’t want her to find out that I got it for her. Jazakallah khair,
Miriam
W/Salaam, I do not sell the pan, but it should be available in any indian/asian utencils shop. It will probably be more commonly known as an appam pan.
Can we fry them??Thanks in
Can we fry them??Thanks in advance:)
I am not sure if the shape
I am not sure if the shape will be maintained if fried, and they may get oily. You can shape them like pancakes on a flat frying pan though with just a small drizzle of oil.
I tried to cook mikatisinia
I tried to cook mikatisinia it turned nice
Salaams Fauzia
Salaams Fauzia
Can we make this in a cake pop maker?
W/Salaam, doubt it will work.
W/Salaam, doubt it will work…is the cake pop maker heat/flame proof?
Can I bake them?
Can I bake them?
I am not sure if I have to cook them on a stove or bake. I would prefer baking them in the oven.
On a stove over low heat. I
On a stove over low heat. I’ve actually never baked these.
Hi Fauzia. I tried to make
Hi Fauzia. I tried to make the vitumbua and they turned out really nice in the appam pan. I even tried one in the regular vitumbua pan but it just got stuck and was a mess! But otherwise I must say your recipe was a nice and simple to follow!thank you.
Hi Fauzia,hope you ok,I tried
Hi Fauzia,hope you ok,I tried vitumbua recepie exctly as it is, when I fried it turned out to be like rubber texture, any idea what was the mistake?
Hi, did you by chance overmix
Hi, did you by chance overmix the batter?
Hi Fauzia, made this at the
Hi Fauzia, made this at the weekend. Turned out perfect. Thank you.